Extended description
Selecting High-Content-Screening
Selecting HCS data follows the same selection parent/child logic as for Projects/Datasets/Images, but with the HCS containers: Screen/Plate/Well/Run/Image
One specificity though is about the Run (Acquisition). Runs and Wells are both children objects of a Plate, and Images are attached to both a Run and a Well.
Selecting Images from a Well will select all the Images inside this Well.
Selecting Images from a Run will select all the Images coming from that Run (corresponds to a subset of Images from all combined Well).
Selecting Images from a Screen or a Plate will follow the Well route selecting all Images inside all Wells.
Features of KeyVal_from_csv
Generation of Key-Value pairs
Automatic Generation of multiple Key-Value pairs with the same Key if multiple Values are separated by a defined character
Assignement of namespaces from the csv file (or one for all Key-Value pairs from the script parameter).
Automatic exclusion of Key-Value pairs with empty Values
- Generation of Tags
Supports Tag Sets
Supports selection of Tags by Tag IDs
Creation of new Tags and Tag Sets
Allows restriction to personal Tags only
Exclude empty values from import
If you utilise a .csv with empty values like
name |
id |
manual analysis |
observation |
|---|---|---|---|
A.tif |
120 |
Hit |
|
B.jpg |
121 |
||
C.jpg |
122 |
missing |
by default, the empty cells are skipped during Key-Value pairs creation. If you wish to create a key for empty cells, you can uncheck the box “Exclude empty values”
This might be useful if you plan to fill it in manually later on. If you used an empty key value pair as a title of a “key-value pair section”, consider instead to assign a namesapce to your key-value pair subsets.
Multiple Values per Key
If you utilise the Advanced parameter “Split value on” you can specify one character for which multiple values get split. E.g. setting this to “!” in the following example, it would lead to the creation of two Key-Value pairs key_1 : value_1 and key_1 : value_2 for the Image A.jpg. Despite looking like a list of multiple values for Image B.tif it would generate one Key-Value pair key_1 : value_1, value_2 as the comma is not used in our example as a separator for multiple Key-Value pairs.
OBJECT_NAME |
OBJECT_ID |
key_1 |
|---|---|---|
A.tif |
120 |
value_1!value_2 |
B.jpg |
121 |
value_1, value_2 |
C.jpg |
122 |
value_1! |
Be aware, that for the Image C.jpg two Key-Value pairs key_1 : value_1 and key_1 : would be created (if the “Exclude empty values” parameter is unchecked).
Namespaces
The default namespace for OMERO Key-Value pairs generated in the web-interface and by our script is openmicroscopy.org/omero/client/mapAnnotation.
Only Key-Value pairs with this namespace can be edited in the web-interface later!
Leaving the “Namespace” parameter blank will assign the default namespace to the new key-value pairs created, or
Additionally, you can choose to use custom namespaces, e.g. to utilize the OMERO-Mapr functionalities, for each different Key. To do so just add a first row in the .csv with the first column containing “namespace”. The corresponding namespace for each key is then put above the respective key. If no namespace is given, the script will fall back to the default namespace.
namespace |
Custom_NS |
REMBI_Biosample |
|
|---|---|---|---|
OBJECT_NAME |
OBJECT_ID |
key_1 |
Organism |
A.tif |
120 |
value_1 |
Drosophila melanogaster |
B.jpg |
121 |
value_2 |
Mus musculus |
C.jpg |
122 |
value_1 |
Saccharomyces cerevisiae |
Choosing the CSV separator
When importing annotations from a .csv file, the script tries by default to detect the CSV separator automatically (one of , ; TAB).
It is possible to specify directly which one is used (in the case the automatic detection fails for example). As the text in the annotations may contain commas or semi-column, it is recommended to use TAB as separators.
Columns of parent names
To clarify the provenance of objects listed in the csv, you can choose to export additional columns for the name of the parent objects.
Those columns are by default excluded from the Key-value pairs using the import script (<PARENT> value of the “Columns to exclude” parameter matches all parent containers: PROJECT, DATASET, SCREEN, PLATE, WELL and RUN)
Default Namespace
Leaving the namespace parameter to blank always refers to the same namespace, the “Client namespace”, corresponding to the one given to new Key-Value pairs created inside OMERO.web. This namespace (openmicroscopy.org/omero/client/mapAnnotation in full) is treated differently by OMERO.web as it is the only one that can be edited in its interface.
Target ID, name and excluding column from Key-Value pairs
The name of the columns for the exported objects IDs and names are always the same: OBJECT_ID and OBJECT_NAME.
This will be used by default by our import script, so we recommend to use it. If however you wished to keep your own column naming for the IDs and name of objects, you may specify those in the “Target ID colname” and “Target name colname” parameters of the import script.
While OBJECT_NAME are only used to identify the objects when OBJECT_ID is not there, it remains important to have it inside the .csv to recognize the objects more easily inside a spreadsheet editors. A good use case for the OBJECT_NAME column is to transfer annotations across groups (the IDs of the objects will differ between groups).
Note also that those two columns are excluded by defaults from the Key-Value pairs, by the use of the following three parameters:
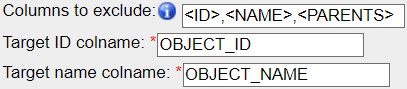
Target ID colname: the name of the column in the .csv that contains the objects IDs
Target name colname: the name of the column in the .csv that contains the objects names
Columns to exclude: <ID> will exclude the column containing the objects IDs, <NAME> will do the same for the objects names, and additional columns can be excluded by indicating their name (e.g. to exclude parent objects column name when used with the export script).
Looking at the output log
When the execution of the script is over (also when it fails), you will be able to look at the ouput of the script by clicking that button highlighed in red in the picture bellow.
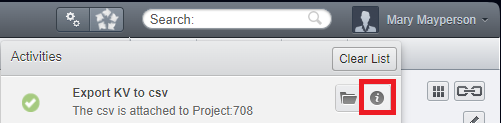
This output will help you understand what has been done/changed, and may help you understand things when they don’t work out the way you expected them.
- Authors:
Tom Boissonnet Jens Wendt
- Version:
1.0 of 2024/03/01